DIY: Gold speckled easter eggs
I found this absolutely gorgeous tutorial on gold foil speckled Easter eggs on SheKnows, and decided to share it here with you. Anything with the words 'fool proof' in the description has my attention, as time is a priceless commodity!
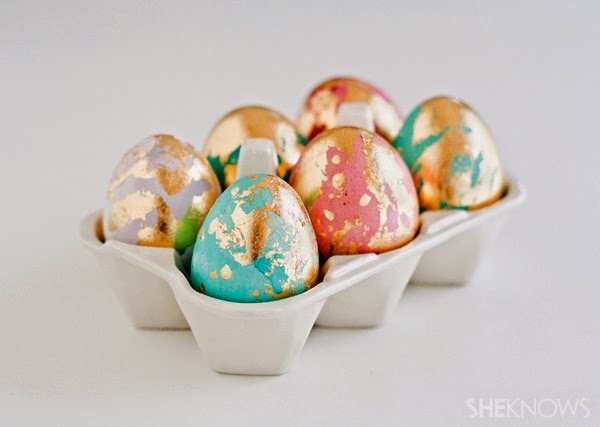
Traditionally-dyed eggs are taken up a notch with a metallic gold leaf treatment. These eggs may look fancy and the leafing process intimidating, but the freeform application goes quickly and is nearly error-proof.
Supplies:
- foam block (mine was 12 x 6 inch)
- 48 toothpicks
- dozen white eggs
- set of food coloring
- white vinegar
- heatproof jars (large and deep enough to dip eggs into)
- metal spoon
- leafing kit (found at the craft store in the framing section) or:
- metallic gold leaf
- size (glue-like liquid for applying gold leaf)
- leafing sealer (optional)
- foam brush
- masking tape for cleaning up metal leaf remnants

Hard-boil a dozen white eggs. While eggs are cooking, boil a small pot of water for the dye.
As you're waiting on the eggs and pot of water to boil, construct a drying rack with a foam block and toothpicks. Space the toothpicks about an inch apart. Every four toothpicks balances one egg, so you do the math!

In each jar, add 2 tablespoons of white vinegar and double the amount of food coloring drops that is indicated on the packaging (I followed the instructions for teal and dusty rose). Carefully scoop out a cup of just-boiled water from the small pot, and pour into one of the jars. Fill the other jars the same way.
Carefully place a hard-boiled egg on a spoon and gently lower into jar. It helps to hold the jar at an angle as you're dipping the egg in. The amount of time you leave the egg in the dye will vary depending on how deep and saturated you want the colors to be. I left my eggs in for less than a minute.

Scoop egg out of the jar with your spoon, and gently lay it atop the drying rack. As your eggs are drying, soak up the drops of dye that pool on the floor of the drying rack with a piece of paper towel.
When the eggs are completely dry, move on to the messy (but fun!) part of leafing. Gently tear a single sheet of gold leaf into quarters (it's very thin) and set aside. Holding an egg so that one side is facing you, use a small brush to apply a thin layer of size in small, random strokes. Take care not to cover entire egg; leave some areas size-free so that you get a marbling effect. Make straight and circular strokes, and add some dot-like dabs. Holding the egg, let it dry for a few seconds.

The size is very sticky, so be careful not to get any on the hand that is applying it, because, with this hand, you will then pick up a quartered sheet of metal leaf and lay it on the surface of the egg facing you. Rub down with either your free hand or with the foam brush. The excess metal will fall off while the rest becomes part of the surface of the egg.

Gently rub the gold leaf to achieve a random, but natural and smooth marbled pattern on the egg. Repeat this process on the other side of the egg. The leaf crumbles will create a mess that's difficult to sweep or wipe, so use a piece of masking tape for easy clean up.

If you emptied out your eggs and plan on keeping them for while, it's a good idea to apply a sealant to prevent the gold metal from oxidizing. Otherwise, your eggs are ready to display or hide for an egg hunt!


Comments